A backyard sand pit can provide hours of fun and sensory play for children of all ages. Find out how to build a simple backyard sand pit with our easy-to-follow guide.
As you create a play area for your little ones, consider installing a sink in your backyard for convenient clean-up and outdoor activities.
Additionally, learn how to make your backyard more private to ensure a secure and secluded play space for your children. Dive in and start designing a delightful backyard retreat for your family.
| Takeaways |
|---|
| A backyard sand pit is a fun and affordable addition to any yard. |
| Choosing the right location and installing a border is important. |
| It is recommended to use a weed barrier to prevent grass growth. |
| Safety should be a top priority, including keeping sand clean. |
| A sand pit cover can help keep debris and animals out. |
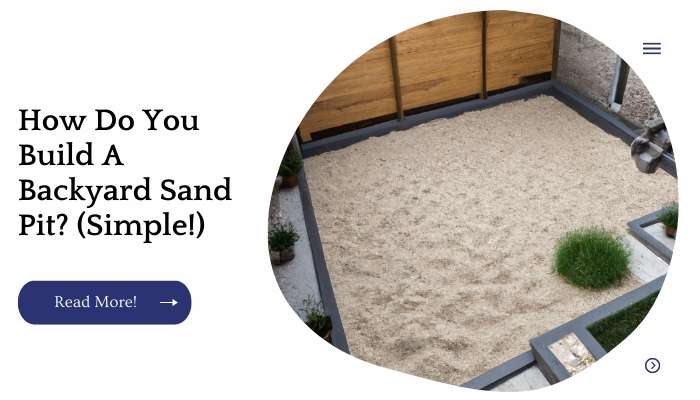
Choose The Size And Location
Once you’ve decided that you want to build a sand pit, the next step is selecting the size and location.
The size of your sand pit will depend on how many kids you are planning on inviting over at once and how much space they will need for building castles, forts, and moats.
The best location for your backyard sandbox is one that gives easy access from all sides of your property so kids can come in and out easily without having to go through the house or risk crossing into an unsafe area.
It’s also important that all sides are safe; this means away from trees, bushes and fences as well as being far enough away from houses or other structures (like garages) so no one hits their head on anything when digging down low with their shovels!
Incorporating rocks in your backyard can elevate the aesthetic and functionality of your space. Discover the cost of different types of rocks in our article about how much do rocks cost for backyard and find the perfect rocks for your backyard project.
Secure A Tarp Under The Area
The next thing you need to do is secure a tarp under the area. This will help prevent leaks and other issues that can cause problems with your sand pit.
To make sure it’s securely fastened, use heavy duty hooks or nails on each corner of the tarp, then fold it over and secure it with more nails or hooks.
Make sure your tarp is large enough to cover the entire area of your sand pit so that there are no holes or gaps in it.
Add A Level Layer Of Gravel
At this point, you should have a nice base for your sandpit. The next step is to add a level layer of gravel. Gravel is an excellent material for use as a base under sand because it will help prevent erosion and make the area look nice.
Considering the cost is an important factor when planning to fully landscape your backyard. Our article on how much does it cost to fully landscape a backyard sheds light on the expenses involved in the process and offers insights on how to save money.
Level And Compact The Gravel
You might think that since the sandbox is going to be built on a slope, you could just dump the gravel into place and let it flow down. However, this isn’t a good idea for several reasons:
- You’ll lose control of the shape of your sand pit and it will be much harder to keep the edges level.
- It will be harder to compact because there are no spaces between each piece of gravel.
Instead, do this: Use a rake to spread out all of your gravel evenly over the area where you want your sandbox base layer.
Then use a tamper or flat piece of wood (a 2×4 works well) press down on top of each piece so they interlock with one another.
The more pressure you apply, the better! Once all areas have been compacted as much as possible without leaving any voids between pieces of stone or sand, cover them with grass clippings or leaves if desired and wait until springtime before continuing construction activities in preparation for building your sand pit walls.
Protect The Ground With A Weed Barrier
Weed barriers can be made of plastic, landscape fabric or cardboard. They should cover the entire area where you’re going to put in your sand pit and be buried under at least 2 feet of sand so that weeds can’t grow through them.
Line The Pit With Landscape Fabric
Once you have the pit dug out and lined with gravel, it’s time to line the bottom with landscape fabric.
This will prevent weeds from growing through into your sand pit, which will keep your kids from having a terrible day of digging up weeds instead of playing in their awesome new sandbox on their first day at home.
Landscape fabric can be purchased at most garden stores, or if you know someone who’s handy with sewing machines (or just has some extra scrap material), ask them to make some for you!
The fabric should be wide enough to fully cover your entire sandbox area this is important because otherwise there won’t be any room left for playtime fun!
To install landscape fabric over gravel: Lay down several pieces of heavy cardboard or other protective material; these will protect against puncturing the landscape fabric by sharp objects like shovels or trowels as well as providing some cushioning between layers.
Cover this layer with landscaping cloth; use staples or weights to hold it down around edges before laying another layer over top. Continue until all sides are covered completely
Losing a pet is tough, and deciding on where and how to bury them can be a challenging decision. In our article that explains how deep to bury a dog in your backyard, you can learn about the best depth for burying your furry friend safely and respectfully
Add Sand To The Pit
To fill your sand pit, you’ll want to make sure that the sand is as clean as possible. You don’t want to introduce any debris that could cause issues later on down the road.
Once you have your sand ready, it’s time to start adding layers of it into the pit. Make sure that there are no large pockets of air in between layers of sand; otherwise, you will end up with an uneven surface once everything has settled.
When adding each layer, use a shovel to level out any high or low spots until all sides are evened out and flat.
Once all of your layers are in place and leveled, use a rake to smooth over top surfaces so that they look nice and neat before moving onto compacting them down with a trowel (or any other small tool).
| Sandpit Size | Amount of Sand Needed |
|---|---|
| 2′ x 2′ | 500 lbs. |
| 4′ x 4′ | 1500 lbs. |
| 6′ x 6′ | 3000 lbs. |
| 8′ x 8′ | 5500 lbs. |
| Custom size | Calculate sand amount based on sandpit area |
Level And Compact The Sand Carefully
The next step is to level and compact the sand carefully. Leveling means that all parts of the pit are at the same height, but it’s also important not to make it too flat or you’ll have trouble getting your sandcastle up later.
To level a section, use a rake to smooth out any dips before moving on to another part of the pit. Once you’ve got it all even, use your tamper (or just stomp) to compress all those loose grains together into one solid surface.
Make sure that once you’re done leveling and compressing that there aren’t any large clumps of sand; if there are some patches where there’s more than others, just use your rake again until everything is uniform again!
Now comes time for fun!
Creating an inviting backyard space involves more than just installing a sandpit. How do you put turf down in your backyard, a guide to creating a lush green backyard to complement your sandpit
Fill In Gaps, If Needed, And Compact Again
If your sand pit does not have a smooth surface, use a rake to remove excess sand. Then, use a tamper to compact the sand and make sure that it’s as level as possible.
If you have gaps in between the pavers or blocks that you used as edging for your sandbox, fill them with more sand until they’re level with the rest of your sandbox’s surface.
Next step: wetting down this area of exposed dirt or grass so that it will properly absorb water into its core during watering sessions later on down the road; then proceed to tamp down again with either hand tampers or power tampers (if you’ve got one available).
Cover The Sand Pit With Wood, Pavers Or Other Materials
Once the sand pit is dug, cover it with wood, pavers or other materials. Make sure to cover the sand pit with something that is waterproof.
Keep your covering in place by using something like bricks or stones to weigh it down and make sure that no one falls into the sand pit.
If you are using a lightweight material such as wood, make sure that you do not use too much of it so that people don’t fall through as they play around.
| Material | Pros | Cons | Cost |
|---|---|---|---|
| Wood decking | Durable, natural look | Requires regular maintenance | 30 per square foot |
| Rubber playground tiles | Soft, safe for children | Expensive upfront cost | 18 per square foot |
| Artificial turf | Low maintenance, soft surface | Expensive, poor drainage | 14 per square foot |
| Pavers | Durable, wide range of styles | Need a level surface, labor-intensive installation | 30 per square foot |
| Pea gravel | Inexpensive, easy-care | Can get tracked into other areas, need additional border | 2 per square foot |
Test Or Use The Sandpit Appropriately
Now that you have a sandpit, it’s time to test or use it appropriately. Check for safety first by making sure the structure is stable and won’t collapse on you.
If there are any holes or cracks in the walls or floor, fill them with something sturdy like cement or mortar.
Then test the sandpit for strength by sitting on it make sure there aren’t any weak spots that could break under your weight!
Once all of these checks are done, use your sandpit for its intended purpose: having fun! But don’t build your pit in an area prone to flooding because when rain falls on top of the sandy soil, it can wash away dirt and loosen rocks below ground level which could cause instability in your structure over time (and even worse).
Need a break from the sandpit? Consider building a backyard terrace to expand your outdoor living space. Check out our article on how do you build a backyard terrace for tips on designing and creating your perfect outdoor living space
Conclusion
Hopefully, this guide has provided you with the information needed to build a sandpit in your backyard.
Remember that these are just basic guidelines, so feel free to adjust as needed. If you have any questions about how to build one yourself, please don’t hesitate to contact us!
Further Reading
Here are some additional resources related to backyard improvement and DIY projects:
How Do You Build a Backyard Terrace? Pro Tips: Learn how to build a beautiful and functional terrace in your backyard with these pro tips.
How Much Do Rocks Cost for Backyard? Explained: Discover the costs associated with using rocks in your backyard and get ideas on how to use them in your landscaping.
How Do I Make My Backyard More Small? Easy Way: Find out how to make the most of a small backyard with these simple and easy tips.
How Do You Put Turf Down in Your Backyard?: Learn how to install turf in your backyard to create a lush and green lawn.
How Do You Build a Concrete Backyard Floor?: Get step-by-step instructions on how to pour and finish a concrete floor in your backyard.
How to Make a Natural Children’s Sand Pit: Discover how to create a natural and sustainable sand pit for children using eco-friendly materials.
DIY Sandbox With Lid | How to Build a Sandbox | Outdoor Kids Activity: Watch a tutorial on how to build a DIY sandbox with a lid for a fun and safe outdoor activity for kids.
FAQs
How do I build a backyard sand pit?
To build a backyard sand pit, you will need to choose a suitable location, mark out the area, and dig a hole. Then, you will need to install a border or frame to contain the sand and fill the pit with sand.
What materials do I need to build a backyard sand pit?
To build a backyard sand pit, you will need sand, lumber or other materials to create a border or frame, stakes, a level, and a shovel.
How deep should a backyard sand pit be?
A backyard sand pit should be at least 12 inches deep to provide enough sand for children to play in.
How do I maintain a backyard sand pit?
To maintain a backyard sand pit, you will need to rake and sift the sand regularly to remove debris and keep it clean. You may also want to cover the sand pit when not in use to keep it free from rain, animals, and other debris.
Are there any safety concerns with a backyard sand pit?
Yes, there are some safety concerns with a backyard sand pit. To minimize the risk of injury, it is important to choose a safe location, supervise children while they play, and keep the sand pit clean and free from debris. It may also be a good idea to use a cover when the sand pit is not in use to prevent animals from using it as a litter box.

For 15 years, Hellen James has worked in the gardening industry as an expert and landscape designer. During her career, she has worked for a variety of businesses that specialize in landscaping and gardening from small firms to large corporations.