Recirculating hydroponic systems is an efficient and effective way to grow plants indoors. In our blog post on [How Do You Build a Recirculating Hydroponic System? we provide a step-by-step guide on building your own recirculating hydroponic system, including the required materials and setup process.
| Key Takeaways |
|---|
| Hydroponic nutrients are essential minerals and nutrients dissolved in water and used to feed plants in a hydroponic system. |
| There are two main types of hydroponic nutrients: organic and synthetic. |
| Hydroponic nutrients provide plants with the necessary minerals and nutrients for healthy growth and development. |
| Choosing the best hydroponic nutrients involves considering the specific needs of your plants and the stage of growth they are in. |
| Proper use of hydroponic nutrients involves following the manufacturer’s instructions for mixing and application. |
For those looking to prune their cherry tomato plants in a hydroponic system, our post on How Do You Prune a Cherry Tomato Plant Hydroponically? offers valuable insights on maximizing fruit production. Join us on our hydroponic gardening journey and discover more tips and tricks for a thriving indoor garden.
Step 1: Find A Location For Your System
Depending on the size of your hydroponic system, you will need to find a location that is away from direct sunlight, drafts, and heat sources. Some good places include:
- A basement or garage (if it doesn’t get too hot).
- An attic or another room that is not used for heating or cooling.
- Underneath an overhang where there is the shade most of the day.
“Properly using hydroponic nutrients is essential for the success of your hydroponic system. Our guide on how to use hydroponic nutrients provides detailed information on the different types of nutrients and how to use them to maximize plant growth and health.”
Step 2: Lay A Synthetic Flooring Material
Place a synthetic flooring material on the bottom of your grow box. This will allow for better drainage of water and prevent roots from becoming waterlogged.
Your grow box doesn’t have to be made of wood, as it could also be made from plastic or metal. If you are using a wooden box and do not want to drill holes in the bottom, place some sort of covering over it this could be plastic sheeting or waterproof tape.
If you have access to carpet remnants, cut out pieces that fit perfectly inside your grow box and lay them down vertically along its walls (with the backing facing outward).
As mentioned earlier, rubber and vinyl are also viable options for laying down on top of your flooring material as they help keep moisture away from plants’ roots while still providing good drainage underfoot.
“Keeping your hydroponic system clean is important for preventing the spread of diseases and ensuring healthy plant growth. Learn how to clean your hydroponic lines with our easy-to-follow guide on how to clean hydroponic lines.”
Step 3: Place The Reservoir
Place the reservoir in a place that is easily accessible, but also out of direct sunlight.
The reservoir should be placed somewhere where it will not be exposed to heat sources or moving parts (like an air conditioner), as these can cause fluctuations in temperature that could affect the water temperature. The reservoir should also be kept away from sharp objects, pets and children.
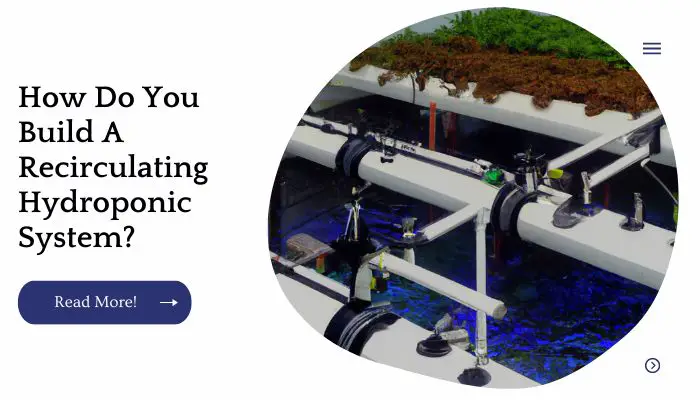
Step 4: Assemble And Install The Plumbing
Use flexible tubing for both the water intake line, which carries water from your reservoir to your pump, and the air line, which carries air into your grow bed. The flexible tubing allows you to flex it as needed while still reducing wear on its surface that could lead to clogs or leaks.
Use rigid piping for all other parts of the system:
For example, use a rigid PVC pipe for both the nutrient solution output line (which connects with your grow bed) and the nutrient solution return line (which connects with a de-mineralizer).
These two pieces should be connected by a T joint so that they can run parallel but not in contact with each other until they reach their final destination at their respective ends of each piece of equipment.
Step 5: Place And Fill Pots With Media
Now it’s time to place your pots into their respective slots. Make sure they are level and secure in place.
Next, fill each pot with media (vermiculite, perlite or rock wool) until it is full. When you’re done, you should have 10 pots filled with media lined up in your system. Now it’s time to place the plants in each pot!
“Choosing the right nutrients for your hydroponic system can be overwhelming, but our list of good hydroponic nutrients can help make the decision easier. We’ve compiled a list of high-quality nutrients that will provide your plants with the necessary nutrients for optimal growth and health.”
Step 6: Drop Plants Into The Pot Into Their Designated Slots
Now that all of your plants are in place, it’s time to transplant them from their grow buckets into the new pots. Make sure that the potting mix is moist and that you add enough substrate to cover up to 1/2 inch of your plant’s roots.
The planting depth should be about 1/3 of the pot’s capacity. This will give you enough room for additional growth over time and will help prevent root rot by giving more air circulation around each individual plant.
After all, plants have been transplanted, use a marker or pen to mark their positions on top of each tray so you know where they are later on in case something goes wrong with one or two plants!
Step 7: Insert The Intake Pump Into The Reservoir
With the intake manifold in place, it’s time to get your pump set up. You’ll want to put the intake pump into the nutrient solution and make sure it’s submerged.
If there is not enough water in your reservoir, add more until you see bubbles coming out of all four holes on the bottom of your pump head.
When setting up your recirculating hydroponic system, this step may look a bit intimidating at first glance but don’t worry! It only takes a few minutes and will help ensure that all of your plants get enough nutrients while they’re growing.
“Promoting healthy root growth is crucial for the success of your hydroponic system. Our guide on how to promote root growth in hydroponics provides tips and tricks for optimizing root growth and ensuring healthy plant development.”
Step 8: Add Nutrient Solution To The Reservoir
Your system is now complete and ready to start growing plants. Next, you’ll need to add nutrient solution to the reservoir and make sure the pump is working correctly.
The last step is to set up an automatic timer that will turn on your pump at regular intervals throughout the day, so that nutrient solution gets added as needed.
You can do this by connecting a timer device like an Arduino or Raspberry Pi directly to your controller circuit board and programming it with this basic sequence of events:
If a new day has begun (meaning time has passed since last night), then fill up the reservoir with nutrient solution until it reaches its max capacity; then shut it off for 8 hours until morning.
Step 9: Turn On Your Recirculating Hydroponic System
To turn on the system, simply plug in the pump and make sure that water is flowing from your reservoir to your grow bed.
If you have any problems with your recirculating hydroponic system, don’t panic! There are tons of resources online for troubleshooting and fixing issues with your setup. You can also ask someone more experienced than you for help if you’re still having trouble resolving an issue.
The next step is to feed plants once per week or so by adding nutrients to the recirculating hydroponic system’s reservoir according to instructions from the manufacturer (or just eyeballing it).
This will keep them growing strong while maintaining a healthy pH balance in their roots and it’ll be easier on both you and them as well!
“Clay pebbles are a popular choice for hydroponic growing media, but they may not be easily accessible in all areas. Check out our guide on alternatives to clay pebbles for hydroponics to learn about other options for growing media that can be used in your hydroponic system.”
Step 10: Feed Plants Regularly According To Your Fertilizer Product Label Instructions
It’s important to feed plants regularly, because they need nutrients to grow. Here are some tips for feeding:
Feed your plants at least once a week with an all-purpose fertilizer or plant food that’s formulated for plant growth.
Use the recommended amount of fertilizer per gallon of water, which is listed on the product label.
You can also use a pH test kit to determine when it’s time for more nutrients in your system (more on this later).
Step 11: Monitor Ph Levels Once A Week By Testing With Litmus Paper
pH levels should be between 5.5 and 6.5. pH is affected by the number of nutrients in the solution, temperature, and type of media used.
Properly maintained pH provides your plants with adequate nutrition, prevents premature flowering and inhibits diseases that thrive at lower or higher pH levels than recommended for hydroponics systems.
To determine whether or not your system needs to be adjusted:
Test with litmus paper once a week by adding one drop of standard household vinegar (acetic acid) to a small amount of water from inside your reservoir (not from your pump).
If necessary, adjust the water’s pH level with liquid hydroponic nutrients according to the label directions on the product packaging.
Conclusion
And there you have it! Now you can enjoy the fruits of your labor and reap the benefits of hydroponic gardening.
Further Reading
Here are some additional resources on hydroponic nutrients that you may find helpful:
Best Hydroponic Nutrients for Your Plants: This article provides a comprehensive overview of the best hydroponic nutrients for your plants, including organic and synthetic options.
The Top Hydroponic Nutrients for Growing Healthy Plants: Garden Beast provides an in-depth review of the top hydroponic nutrients available in the market.
The 10 Best Hydroponic Nutrients for Your Garden: Trees.com provides a list of the top 10 hydroponic nutrients for your garden and explains the benefits of each one.
FAQs
What are hydroponic nutrients?
Hydroponic nutrients are a mixture of essential minerals and nutrients that are dissolved in water and used to feed plants grown in a hydroponic system.
What types of hydroponic nutrients are available?
There are two main types of hydroponic nutrients: organic and synthetic. Organic nutrients are derived from natural sources, while synthetic nutrients are made in a lab.
What are the benefits of using hydroponic nutrients?
Hydroponic nutrients provide plants with the necessary minerals and nutrients for healthy growth and development. They also allow for precise control of nutrient levels, leading to better yields and faster growth.
How do I choose the best hydroponic nutrients for my plants?
When choosing hydroponic nutrients, consider the specific needs of your plants and the stage of growth they are in. Look for nutrients that provide the essential minerals and nutrients your plants need at each stage of growth.
How do I use hydroponic nutrients?
Hydroponic nutrients are mixed with water to create a nutrient solution that is fed to plants in a hydroponic system. Follow the manufacturer’s instructions for mixing and application to ensure optimal plant growth and health.

For 15 years, Hellen James has worked in the gardening industry as an expert and landscape designer. During her career, she has worked for a variety of businesses that specialize in landscaping and gardening from small firms to large corporations.